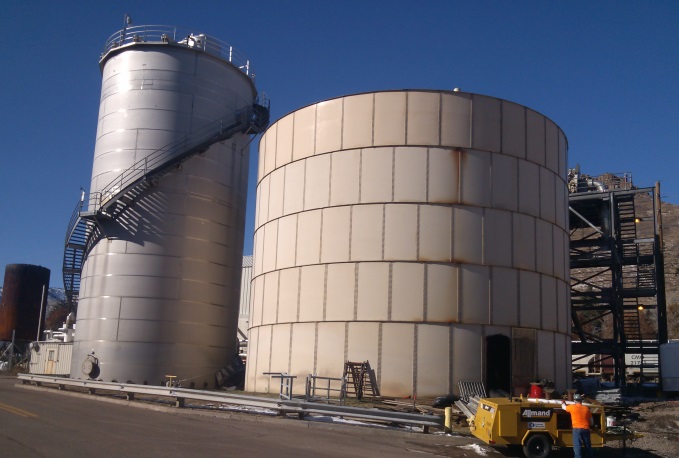
Everyone knows Colorado winters can be brutally cold. And no one knows this better than the Utility Maintenance Contractors (UMC) crew that was tasked with repairing, prepping, and coating the interior of a 14,000-square-foot (1,300.6 m²) bolted steel tank at a well-known brewery that wishes to remain unnamed.
“The project was under a unique time constraint due to the fast-approaching winter weather. The job started in mid-October, and we were racing the November freeze,” explained Kyle Long of UMC. According to Long, the tank is used in the first step of the wastewater recycling process at the brewery. This tank in particular contains small, living organisms (aka bacteria) that eat the solids in the wastewater before the water is piped to the next stage in the process. These organisms were relocated to a temporary holding tank for the duration of the project, but if they were not returned to the permanent holding tanking before a hard freeze hit, they could be destroyed. With the clock ticking and the cold moving in, the team got to work.
Steel Fix
The interior of the 55-foot (16.8 m) diameter by 43-foot (13.1 m) tall tank was in desperate need of rehabilitation and recoating. “The steel surface had been factory painted with a very thin layer of paint. The paint was peeling off in much of the tank, and certain areas of the steel were heavily corroded and rusted. Several very small areas of the tank floor were rusted completely through to the point that we could see daylight,” said Long. These small holes were repaired using a fiberglass patching kit to prevent any leaks.
Other areas of the tank were also in poor shape, with severe corrosion occurring on the center support column, the upper tank walls, and the roof beams. As stated by Long, the UMC crew removed the existing support column and roof beams and replaced them with new beams that were abrasive blasted and coated offsite prior to the start of the job. “We pulled down every other beam so that we still had roof support. The newly prepped and coated beams were brought over to the jobsite on our flatbed trailer and installed in the tank. We repeated this process until all the support beams were replaced,” stated Long.
Operation Access
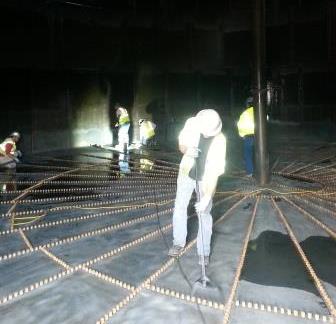
In addition to the corrosion issues, the crew also had to contend with the challenge of access. There were two existing access points for the tank: a small roof hatch at the top of the tank and a two-foot (0.6 m) by three-foot (0.9 m) hatch at the bottom of the tank. “Obviously, we needed a way to get equipment and our 15-man crew into the tank, so we cut an 8-foot-tall [2.4 m] by 4-foot-wide [1.2 m] entryway into the base of the tank,” said Long.
For the work on the ceiling of the tank and to remove and install the support column and beams, scaffolding was erected. The ring-and-lock scaffolding system was constructed by Colorado Scaffolding & Equipment and provided a complete floor for work on the ceiling and a continuous, railed walkway for work on the tank walls. “DBI SALA harnesses, shock absorbing lanyards, and self-retracting lifelines were used on the upper deck of the scaffolding in areas where no guard rails were installed,” stated Long.
Blast and Prep
 Once the scaffolding was in place, the crew was ready for the surface preparation process. The entire interior of the tank was wet-abrasive blasted in order to remove any existing rust or corrosion and to create the proper profile for optimum adhesion of the Oak Ridge primer and polyurea topcoat. The crew used an EcoQuip EQ400T-A Vaporblaster loaded with 30/60 copper slag to blast the ceiling, walls, and floors of the tank. The support column and beams were blasted with the same equipment and media at the UMC shop prior to being brought to the jobsite. “For the blasting that occurred inside the tank, we had to be extremely careful to contain the copper slag as we needed to avoid contaminating the stream that runs through the area. The material was cleaned out of the tank using a vacuum truck and properly disposed of offsite,” stated Long. An A.C.T. dust collector was also used in the tank’s interior.
Coating Countdown
With the winter weather drawing closer, the UMC crew was feeling the pressure to install the Oak Ridge coating system. Using a Graco Xtreme45 airless sprayer, the team applied five mils (127 microns) of Oak Ridge OR-EP100 epoxy primer to the ceiling and walls of the tank. According to Rich Franklin of Oak Ridge, this particular primer not only adheres well to a properly prepared steel substrate but also aids in the performance of the polyurea topcoat. “The polyurea adheres extremely well to the OR-EP100 primer. In fact, many pull tests were conducted during the job, and the results exceeded expectations every time,” stated Franklin.
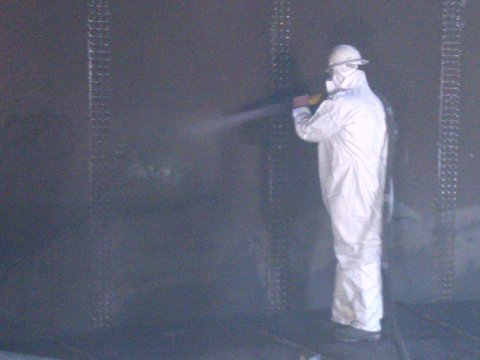 It was then time for the crew to apply 80 mils (2,032 microns) of Oak Ridge OR-70SS polyurea topcoat using a Graco Reactor E-XP2 plural component proportioner. “The main reason this coating system was chosen was for its excellent chemical and abrasion resistance properties. The polyurea can withstand the extreme conditions that exist inside of the tank,” explained Franklin.
Once the ceiling and walls were primed and coated, the scaffolding was removed, and the entire process was repeated on the floor of the tank. Long was sure to point out that the support column and beams were primed and coated at the shop using the same materials and process as the ceiling, walls, and floor of the tank.
When all beams were replaced and the ceiling, walls, and floor were primed and coated, it was time to close up the temporary entry hatch. The crew replaced the section that had been cut out with an entirely new section that was already abrasive blasted and primed. This area was then tied in to the rest of the coating once it was hung in place. The crew exited out of the small built-in hatch at the bottom of the tank.
For the duration of the job — the coating application — the crew wore Honeywell’s Sperian full-face, negative pressure, supplied-air respirators. “Hard hats, safety glasses, gloves, steel-toed boots, and reflective vests were worn at all times. When needed, crew members also wore hearing protection,” stated Long. The air quality inside the tank was also monitored with Industrial Scientific’s MX 4 Quad air monitor.
Beating the Clock
With a combination of proper planning, efficient and effective prep and application, and some double shifts, the UMC team finished the brewery tank job in five weeks’ time. Most important, they got the tank back in working order before the first hard freeze of the winter.